How To Make Your Pastor’s Headset Sound Great!

Ok, so here’s the deal…
A few days ago, I saw a blog post from someone else who offers advice for church sound guys…
And it made me maybe just a little frustrated.
It was about how to get your pastor’s mic to sound good, which I know is something that frustrates a lot of sound guys.
BUT…
A major part of their solution was to buy a new headset microphone…
A mic that costs SEVEN HUNDRED AND THIRTY DOLLARS.
(For the record, if you’ve read the other article, I think all their content is really great, this one thing just stuck out to me. In my book, anybody who’s helping out church sound guys is absolutely a rockstar!)
I mean, there’s no question about it, a $730 microphone IS going to sound really good, and it might make your job a little easier…
But should “just buy something new” really be the first option that we turn to as sound guys in the church?
I think not.
To me, that leads down a dangerous path of chasing the “latest and greatest” gear and hoping that it will solve your problems (spoiler alert: it won’t) instead of investing in what ACTUALLY counts…
Your skill as an engineer.
I’M HERE TO TELL YOU THAT YOU CAN MAKE AMAZINGSOUND FOR YOUR CHURCH WITH THE GEAR YOU ALREADY OWN.
What you need is knowledge and someone to teach you how to listen.
That’s it. No big secret.
(Actually I take that back, there ARE secrets to great sound, but they don’t have to do with your gear… 😉
So now, I’m going to teach you how to get a great tone out of your pastor’s mic, fight feedback, and have an easier time mixing without dropping any of your church’s money on any new gear.
Let’s do this.
FIRST UP: MIC POSITION
This might be the most obvious trick, but ohhh boy, do people get it wrong!
Whatever model headset mic you’re rocking, it’s GOT to be placed at the right spot on the communicator’s face.
In my experience, bad mic placement has been the number one cause of feedback for headset mics. It’s a huge issue.
This is what your mic placement should look like:
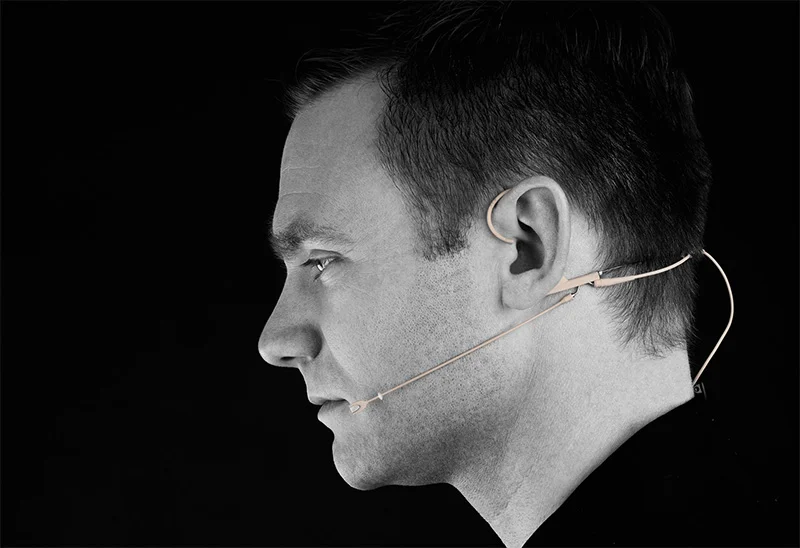
See how it’s just at the corner of his mouth, and slightly below the bottom lip?
That’s exactly where you want it.
If it’s pointing up at his nose or down across the chin, you’re going to have a massively difficult time getting it to sound good.
Now, I know that sometimes mics will shift while the communicator is talking and moving around.
Fortunately, there’s a solution for that!
Get some skin colored surgical tape to tape the mic in place. You can use it behind the ear, or on the cord if the speaker has a tendency to pull it while moving around.
My favorite is from 3M and it’s available right here on Amazon for like five bucks. 3M Micropore Tan Surgical Tape 0.5″ wide -2 rolls
SUPER SECRET TRICK #2: SET YOUR GAIN RIGHT!
Yeah, I know this is the least super secret trick ever. But you’ve gotta get it right! If you’re clipping your preamp when the communicator gets loud, it’s going to sound terrible! On the other hand, if you under-gain the mic, you’ll end up adding volume in some other way (EQ, compression make-up gain, cranking your fader) and end up with a noisy signal.And let’s be real…nobody’s got time to waste on that!
We covered how to set your gain in this blog: http://www.worshipsoundguy.com/blog/2016/8/29/gain-staging-101
So go read that if you’re unfamiliar with the basics!
NEXT…EQ FOR THE WIN!
Guys, this is SO important. I can’t stress this enough. If there’s one place where people constantly mess up… it’s on EQ.
Here’s the thing: every mic sounds different, and every person’s voice is different…
So where do you start with EQ??
Don’t just start turning knobs and hope that it sounds good… that’s amateur hour and we’re not about that life!
First: listen to the communicator’s actual voice.
Just go talk to them. Literally. That’s it.
Ask them how their day is going and take note of how their voice sounds. Is it deep and bass-y? Or more present and more “in your face”? Do they talk evenly? Or have volume changes from loud to soft?
The speaker’s actual voice is going to inform EVERY EQ move that you make.
HERE’S YOUR GOAL: YOU WANT TO MAKE THE “SOUND” OF THE MICROPHONE DISAPPEAR.
WAIT… WHAT??
Yeah. I know, that sounds weird. But every mic has a “sound”.
Maybe it’s muddy.. maybe it’s shrill.. maybe you actually DO have that $730 mic and it’s very flattering..
It actually doesn’t matter…
Either way, the sound of the microphone is changing the communicator’s voice as it passes through.
So remember step one where we just listened to the person’s voice? Ok, think about that… and then listen again.
How does it sound different now?
Is there more high end? More bass? Is it harsh or shrill?
It’s kinda like that “find the difference in these two pictures” game that we all played as kids, but this time with two sounds.
Identify the differences you hear. Maybe even write them down if you really want to be a boss sound guy 😉
Then, and only then, we’ll start EQ-ing to eliminate those differences.
Super quick side note… we cover this kind of thing really in-depth in our Sound Guy Essentials course. It’s over 8 hours of hands-on video training for live sound engineers in church that’s going to make doing EQ like this an absolute breeze.
I definitely don’t want to get all sales-y, cause I always want you to feel like you can come to this site and get great info completely free, but if you are interested in going deeper, I’d love to offer you a chance to jump in to this course and save 10% while you’re at it.
Head over to www.soundguyessentials.com and just use the code “SAVE10” when you check out to get your discount.
We’re really excited about this course and I think it can make a huge difference in your mixing.
Ok, now, back to EQ!
As you move through your EQ, pay special attention to how each move you make is affecting the tone of the voice compared to how you remember the voice sounding when you were just talking with the communicator earlier.
If your eq move isn’t getting the sound closer to that original “non-mic’d” sound… don’t do it!
Always remember, use your EQ to literally “equalize” the differences between the source (the raw voice) and the mic’d sound you hear coming through the system.
LAST… GET COMPRESSED!
Compression on a speaking voice is tricky. People are so used to hearing the human voice speak in a natural setting, that when you process it too much, people will think it sounds weird and be turned off by it, even if they don’t quite realize why.
You need to be aware of that in order to compress effectively.
Your goal with compressing a communicators voice is simply to be as transparent as possible while reducing the differences between the loud and soft sections of the voice.
I start with a 4-to-1 ratio, and a pretty fast release time. Like 40-50ms or maybe even less. A faster release will sound more transparent and less noticeable. Obviously, you can go overboard and make it too fast, so you need to know how to listen for that.
For attack time…I also like to go fast. You can even go down to just a few milliseconds and see what it sounds like.
The idea is that when the communicator gets loud, the compressor will quickly jump in, turn down the volume, and then quickly let it go back to normal when he returns to speaking at a normal level again.
I typically aim for around 4 to 6 decibels of gain reduction at the loud parts, but that’s pretty subjective. Some compressors can get away with a lot more gain reduction and still sound transparent.
It’s simple in theory… tough in execution.
WRAPPING IT UP!
There you have it! Four ways to make your pastor’s mic sound better without buying a crazy new mic!
As always, we want to hear from you, so go hit us up on Instagram, Facebook, and Twitter @WorshipSoundGuy
We drop tons of great tips like this through our social media channels and we don’t want you to miss out!
Last but not least, go join our private Facebook group! It’s an amazing wonderland where you and 2,000 other church sound guys will get to hang out and talk gear, techniques, and get to know each other.
If you haven’t joined the group… I don’t even know what you’re doing right now..
Just do it, click right here and hit join and you’ll be in!
Finally… don’t forget about that 10% discount on Sound Guy Essentials! Click right here to check it out and use the code “SAVE10” when you check out and start taking your mixes to the next level!
P.S.
If you liked this… I think you’ll REALLY like our “70 EQ Tips” eBook.
It’s got 70 of my absolutely favorite EQ tips and tricks for every instrument in your mix.
And… did I mention it’s FREE? Cause it is.


Responses